LVM Linux: Complete Guide to the Logical Volume Manager
It's every sysadmin's nightmare: the production server sends an alert. The partition /var is 100% full and services are collapsing. The partition /home, on the same disk, has 500 GB free and unused. With standard partitioning, the solution is a disaster: downtime, backup, live repartitioning (risky), or reinstallation. This is where LVM (Logical Volume Manager) comes in, transforming storage management from a rigid game to a flexible art.
In this in-depth guide, based on our experience in Linux server support services, we will explore LVM not only as "what it is," but as a strategic tool for system administrators, web agencies, and IT professionals. We will analyze its architecture, operating procedures, and its positioning relative to modern technologies such as ZFS and BTRFS.
Key Concepts in This Article
- What is LVM: LVM is a layer of abstraction (a *mapping layer*) that sits between physical disks and the operating system, decoupling filesystems from physical partitions.
- Architecture: It is based on three components: Physical Volumes (PV), Volume Groups (VG), and Logical Volumes (LV).
- Main Advantage: It allows you to resize volumes (filesystems) "on the fly" (often without downtime), aggregate multiple disks into a single pool of space, and create instant snapshots.
- Modern Context: LVM is a volume manager, not a filesystem. It works in synergy with
ext4oXFS. Technologies such as ZFS and BTRFS, on the other hand, integrate both volume management and advanced filesystem features (such as CoW) into a single product.
The Problem: Why Are Standard Partitions No Longer Enough?
Traditional partitioning (e.g., /dev/sda1, /dev/sda2) is rigid. Once the size of a partition has been defined, changing it is a complex and risky operation. This approach, inherited from decades of computer history, is ill-suited to modern needs:
- Wasted Space: Allocated and unused space in one partition cannot be easily transferred to another partition that needs it.
- Difficult Scalability: Adding a new disk to the server (e.g.
/dev/sdb) does not help to extend an existing partition (e.g./dev/sda1) that is full. - Downtime: Most repartitioning operations require significant downtime and booting from a live disk.
LVM solves these problems by introducing a level of storage virtualization.
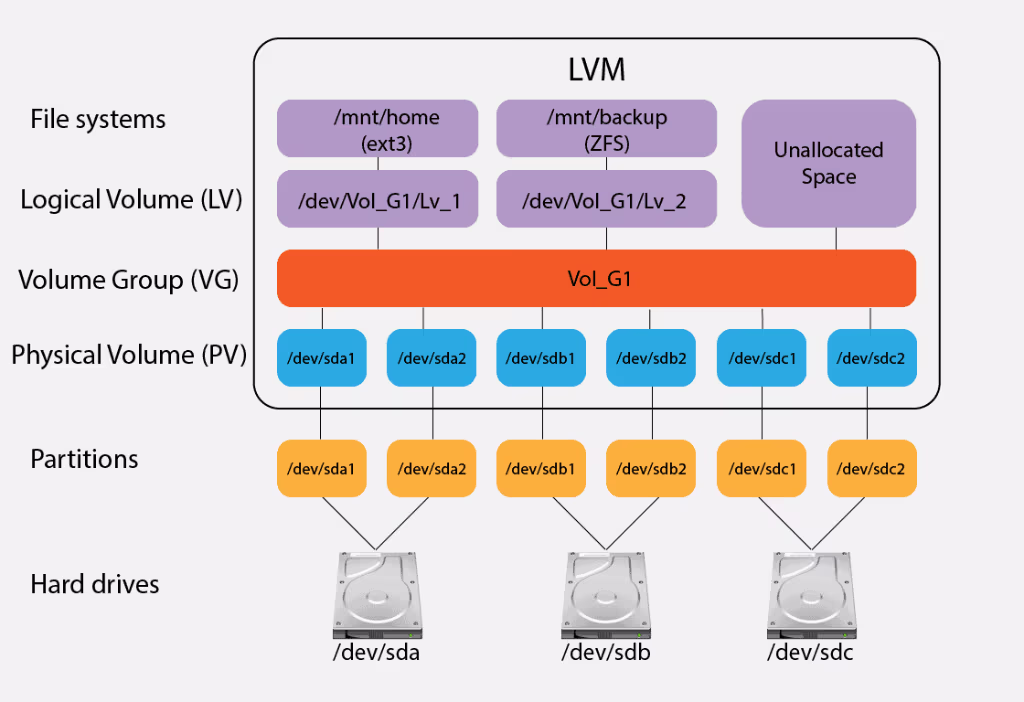
What is LVM (Logical Volume Manager)? The Architecture
The Logical Volume Manager (LVM) is not a filesystem (like ext4 or XFS), but a volume manager. It is a subsystem of the Linux kernel (the device-mapper) that allows you to create and manage "logical" or "virtual" storage volumes.
Imagine your physical disks as LEGO bricks. LVM allows you to break these bricks into smaller, uniform pieces, and then use them to build any structure you want, modify it, and expand it at any time.
The 3 Key Components: PV, VG, LV
To understand LVM, it is essential to master its three-tier architecture. Each tier builds on the previous one.
- Physical Volumes (PV)
- What they are: They are the foundation. A PV is a physical disk (e.g.
/dev/sdb) or a partition (e.g./dev/sdb1) that has been "initialized" for use by LVM. - The Concept: This is the act of "donating" physical space to the LVM pool.
- Key Command:
pvcreate
- What they are: They are the foundation. A PV is a physical disk (e.g.
- Volume Groups (VG)
- What they are: They are the "container" or "storage pool." A VG is created by aggregating one or more Physical Volumes.
- The Concept: If you have two 1TB disks, you can create a single 2TB VG. To the system, this VG is a single entity from which to draw space. This is the heart of LVM's flexibility.
- Key Command:
vgcreate
- Logical Volumes (LV)
- What they are: They are what the operating system sees and uses. An LV is "carved out" of the available space in a Volume Group.
- The Concept: From your 2TB VG, you can create a 50GB LV for
/var, one 100GB LV for/home, and so on. These LVs are functionally identical to traditional partitions (e.g./dev/sda1) but with one huge advantage: they can be resized. - The Path: The operating system will see them as devices in
/dev/VG_NOME/LV_NOMEor/dev/mapper/VG_NOME-LV_NOME. - Key Command:
lvcreate
On these Logical Volumes (LVs) you will then create your filesystem (e.g.
mkfs.ext4 /dev/mio_vg/mio_lv) and finally mount it.
Practical Guide: Configuring LVM in Linux (Step-by-Step)
Let's look at a common use case: you have a server with a disk already in use (/dev/sda) and you have just added two new disks (/dev/sdb and /dev/sdc) that you want to use for web application data in /srv/webapp.
Step 1: Initialize the Physical Volumes (PV)
First, let's identify the disks. (Caution: be sure to use the correct names. These commands are destructive if used on the wrong disk).
$ lsblk
NAME   MAJ:MIN RM  SIZE RO TYPE MOUNTPOINT
sda      8:0    0  100G  0 disk
├─sda1   8:1    0    1G  0 part /boot
└─sda2   8:2    0   99G  0 part /
sdb      8:16   0  500G  0 disk
sdc      8:32   0  500G  0 disk
Our target disks are /dev/sdb e /dev/sdc. Let's initialize them as PVs:
$ sudo pvcreate /dev/sdb /dev/sdc
  Physical volume "/dev/sdb" successfully created.
  Physical volume "/dev/sdc" successfully created.
You can verify with pvs or pvdisplay.
Step 2: Create the Volume Group (VG)
Now, let's combine these two PVs into a single Volume Group. We'll call it vg_data.
$ sudo vgcreate vg_data /dev/sdb /dev/sdc
  Volume group "vg_data" successfully created
Verifying with vgs o vgdisplay, you will see a single VG with a total capacity of approximately 1TB (500G + 500G).
Step 3: Create the Logical Volume (LV)
From our VG vg_data, we create a Logical Volume for the application data. We will call it lv_webapp. Let's say we want to start with 100GB.
$ sudo lvcreate -n lv_webapp -L 100G vg_data
  Logical volume "lv_webapp" created.
Pro Tip: If you want to use all the available space in the VG, you can use -l 100%FREE instead of -L 100G.
Our new volume is now available in /dev/vg_data/lv_webapp.
Step 4: Format and Mount the LV (with /etc/fstab)
This is a standard block volume. We need to create a filesystem on it (we will use ext4):
$ sudo mkfs.ext4 /dev/vg_data/lv_webappNow let's create the mount directory and mount it:
$ sudo mkdir -p /srv/webapp
$ sudo mount /dev/vg_data/lv_webapp /srv/webapp
Finally, to make it permanent on reboot, we modify /etc/fstab. It is best practice to use the path /dev/mapper/ or the UUID instead of the path /dev/vg_nome/.
$ sudo nano /etc/fstab

# Aggiungi questa riga in fondo al file:
/dev/mapper/vg_data-lv_webapp  /srv/webapp  ext4  defaults  0  0
Save and exit. Now your LVM volume is ready and productive.
Advanced Management: Essential LVM Operations
The true power of LVM is seen in day-to-day management. The commands are logical: lvextend (extend), lvreduce (shrink), vgextend (extend), etc.
How to Extend an LVM Volume (lvextend)
Your lv_webapp 100GB volume is filling up. You still have free space in the vg_data. Let's extend it by 50GB.
Step 1: Extend the Logical Volume.
$ sudo lvextend -L +50G /dev/vg_data/lv_webapp
  Size of logical volume vg_data/lv_webapp changed from 100.00 GiB (25600 extents) to 150.00 GiB (38400 extents).
  Logical volume vg_data/lv_webapp successfully resized.
Step 2: Extend the filesystem. (This is the step that many people forget!)
LVM has enlarged the "container," but the filesystem (ext4) inside still only occupies 100GB. We need to tell it to use all the available space. This can be done "hot" (online) for ext4 and XFS.
$ sudo resize2fs /dev/vg_data/lv_webapp
resize2fs 1.45.5 (07-Jan-2020)
Filesystem at /dev/vg_data/lv_webapp is mounted on /srv/webapp; on-line resizing required
old_desc_blocks = 13, new_desc_blocks = 19
The filesystem on /dev/vg_data/lv_webapp is now 39321600 (4k) blocks long.
Done. Your filesystem is now 150GB, without any downtime.
How to Reduce an LVM Volume (lvreduce) - The Safe Procedure
CAUTION: Reducing a volume is a highly risky operation and cannot be done online. An error will result in total data loss. Always proceed with a verified backup.
- Backup:** Perform a full backup of the volume.
- Unmount the Filesystem:
sudo umount /srv/webapp - Check the Filesystem:
sudo e2fsck -f /dev/vg_data/lv_webapp Reduce the Filesystem (FIRST):** You must reduce the filesystem to a size smaller than the final size of the LV. If you want an 80GB LV, reduce the FS to 79GB.
$ sudo resize2fs /dev/vg_data/lv_webapp 79GReduce the Logical Volume: You can now reduce the LVM "container."
$ sudo lvreduce -L 80G /dev/vg_data/lv_webapp- (Optional) Re-expand the FS:** To be on the safe side, re-expand the filesystem to occupy exactly 80G of the volume:
sudo resize2fs /dev/vg_data/lv_webapp - Remount:
sudo mount /srv/webapp
LVM Snapshot: "Hot" backup
An LVM snapshot creates a "frozen" (Copy-on-Write) image of a logical volume at a specific moment in time. This is essential for obtaining consistent backups (consistent backups) of databases or virtual machines without having to shut them down, an essential technique that is integrated into virtualization systems with Proxmox and KVM.
To create a 10GB snapshot of our lv_webapp:
$ sudo lvcreate -s -n snap_webapp -L 10G /dev/vg_data/lv_webapp
  Logical volume "snap_webapp" created.
Now you can mount /dev/vg_data/snap_webapp in a temporary directory and run your backup on that mount. The snapshot contains the data *exactly* as it was at the time of creation, while the original volume lv_webapp continues to work and accept writes.
The Modern Context: LVM vs. ZFS and BTRFS
A common misconception is to put LVM in direct competition with ZFS or BTRFS. The distinction is crucial for a proper system architecture.
LVM (The Proven Volume Manager)
As we have seen, LVM manages block volumes. It knows nothing about the files inside them; for that, it relies on proven filesystems such as ext4 or XFS. Its strengths are stability, universality (it is in every Linux distro), and flexibility. The LVM + XFS/EXT4 combination is the workhorse for most enterprise Linux servers.
ZFS (The Total File System)
ZFS (originally from Sun Microsystems) is a radically different system. It is not just a file system, but integrates into a single product:
- A volume manager (like LVM)
- A RAID manager (called ZRAID, very robust)
- An advanced file system (with snapshots, clones, caching (ARC/L2ARC), compression, deduplication, and, above all, checksums and data self-repair).
ZFS is more complex, requires more RAM (its ARC caching is demanding), but offers superior data integrity. It is often used in NAS or heavy virtualization servers.
BTRFS (The Native Linux Response)
BTRFS (B-tree File System) is the Linux kernel's "native" answer to ZFS. Like ZFS, it integrates volume management (it can span multiple disks) and an advanced filesystem with Copy-on-Write (CoW), snapshots, checksums, and subvolumes (similar to snapshots but writable).
BTRFS is lighter than ZFS and is the default file system on many modern distributions (such as openSUSE or Fedora). Although its RAID (5/6) capabilities are still considered less mature than ZFS, it is rapidly becoming a standard for workstations and servers.
Strategic Comparison Table
| Features | LVM (+ ext4/XFS) | ZFS | BTRFS |
|---|---|---|---|
| Volume Management | Yes (LVM) | Yes (Integrated) | Yes (Integrated) |
| RAID Management | Yes (via MDRAID or LVM-RAID) | Yes (ZRAID, very robust) | Yes (RAID 0, 1, 10 stable; 5/6 less mature) |
| Snapshot | Yes (LVM Snapshot, block-based) | Yes (CoW, instantaneous, efficient) | Yes (CoW, instantaneous, efficient) |
| Data integrity (checksum) | No (metadata only in XFS) | Yes (Fundamental, with self-repair) | Yes (with self-repair if in RAID) |
| Complexity | Low/Medium | High (requires tuning) | Medium |
| Ideal use case | General business servers, VMs, where flexibility and stability are priorities. | NAS servers, virtualization, critical data storage where integrity is everything. | Advanced workstations, modern servers, container management (Docker). |
Differences between filesystems
If you want to learn more about the ZFS, BTRFS, and ext4 filesystems, we recommend our article Linux Filesystem Comparison: btrfs vs zfs vs ext4 - Definitive Guide
Resilient Infrastructure and Zero Downtime: Advanced Linux Support.
LVM offers exceptional flexibility, but critical operations such as volume reduction or snapshots in production do not allow for errors. A technical oversight can corrupt the entire file system, causing data loss and catastrophic downtime for the business. Free your team from system emergencies and entrust the continuity of your business to our Linux experts.
Frequently Asked Questions (FAQ) about LVM
Are LVM and RAID the same thing?
No. LVM is a volume manager (for flexibility), RAID is a technology for redundancy or performance (protection against disk failure). They are often used together: you create a RAID array (e.g., RAID 1) and then build LVM *on top* of the RAID array (
/dev/md0) to achieve both protection and flexibility.Does LVM slow down disk performance?
The impact of LVM (the device mapper) on performance is negligible. In modern configurations, the difference is imperceptible, and the benefits in terms of flexibility far outweigh any minimal overhead.
Can I install Linux directly on LVM?
Absolutely. All modern installers from major distributions (Ubuntu Server, Red Hat/CentOS/Rocky, Debian) offer the option "Use LVM" or "Guided partitioning with LVM" during installation. This is the recommended choice for any server.
What are "PEs" (Physical Extents) in LVM?
Physical Extent (PE) is the basic unit of measurement in LVM. When you create a Volume Group, LVM divides the Physical Volumes into these "blocks" (4MB by default). Logical Volumes are then created by allocating a certain number of PEs. It is an implementation detail that allows LVM to easily map logical space to physical space.
Conclusion and External Resources
The Logical Volume Manager (LVM) is a fundamental tool in any Linux professional's arsenal. Although newer technologies such as ZFS and BTRFS offer a more modern integrated approach, the LVM + ext4/XFS combination remains the de facto standard for stability, reliability, and universal flexibility in the world of enterprise servers and cloud infrastructure design.
Understanding its architecture (PV, VG, LV) and mastering management commands (lvextend, lvcreate) transforms storage management from a static and risky operation into a dynamic and controlled process.
To learn more about the technical aspects, we recommend the following authoritative resources:
- Arch Linux Wiki on LVM (An extremely detailed technical resource)
- Red Hat: What is LVM (Official documentation from the main contributor)
- TecMint Practical Guide (Practical examples of commands)