How to Install Proxmox VE 9 Detailed Guide
If you are looking for a powerful, comprehensive, and reliable open-source virtualization solution, Proxmox VE (Virtual Environment) is the answer. This Debian-based platform allows you to centrally manage both virtual machines (with KVM) and lightweight containers (with LXC for containers), making it ideal for businesses and developers who want to optimize their workloads.
With Proxmox, you can create a software-defined infrastructure, manage high-availability clusters, perform backups and snapshots, and much more. In this guide, we will walk you through the process of installing Proxmox VE 9, from preparing the boot media to logging into the web interface for the first time.
For your business infrastructure, delegate the complexities of deployment by relying on our Proxmox assistance for installing enterprise clusters.
System Requirements for Proxmox VE 9
Before you begin, make sure your hardware meets the minimum requirements for a stable installation. Keep in mind that these are the minimum requirements: to handle production workloads, the specifications should be higher.
- CPU: 64-bit (Intel EMT64 or AMD64) with virtualization support (Intel VT/AMD-V).
- RAM: Minimum 2 GB, recommended at least 4 GB (excluding RAM for VMs and containers).
- Storage: Minimum 8 GB of disk space. For optimal performance, fast SSD disks (e.g., NVMe) are recommended.
- Network: One supported network interface card (NIC).
Proxmox VE 9 Installation Guide
To install Proxmox VE 9, the first thing to do is download the official ISO image directly from the manufacturer's website.
Download the Proxmox VE 9 ISO image here
Once you have downloaded the file, follow these steps.
1. Create a Bootable USB Drive
We need to flash the .iso, i.e., write the ISO image to a USB stick so that we can boot the server from it.
On Linux
The most direct method is to use the command dd. First, identify the path of your USB device, for example /dev/sdb - be very careful not to select the wrong disk!
Identify the device
sudo dmesg | tailWrite the ISO image to the USB stick
sudo dd bs=1M conv=fdatasync if=./proxmox-ve_*.iso of=/dev/sdb
On Windows and macOS
For Windows and macOS, the easiest and safest way is to use a tool with a graphical interface. We recommend:
- balenaEtcher: Simple, multi-platform, and reliable.
- Rufus (Windows only): Another great option. Be sure to use "DD Image" mode when prompted.
For more details, the official Proxmox documentation offers in-depth guides.
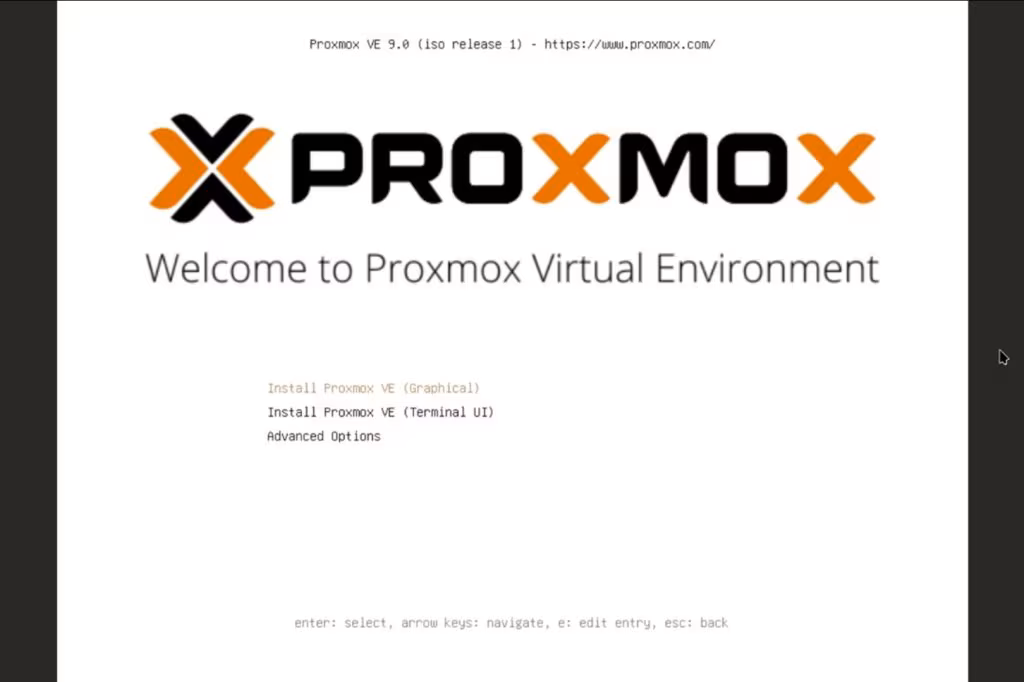
2. Start the Installation Procedure
Now that the media is ready, insert the USB stick into the server and start it up, making sure that the BIOS/UEFI is configured to boot from USB. You will be greeted by the Proxmox boot menu.
- Boot: Select "Install Proxmox VE" and press Enter.

- License (EULA): Accept the license terms to proceed.
- Disk Selection: Choose the target disk for installation. Here you can also configure advanced options such as ZFS (recommended for its resilience).

- Localization: Set the country, time zone, and keyboard layout.
- Password and Email: Choose a strong password for the user
rootand enter a valid email address for system notifications. - Network Configuration: Set a static IP address, netmask, gateway, and DNS for the management interface. This configuration is crucial for accessing the server after installation.

- Summary and Installation: Review the final summary. If everything is correct, confirm to start the actual installation.
When finished, the system will reboot. Remove the USB stick and you will see the Proxmox console login screen.

3. Accessing the Proxmox Web Interface
Proxmox is administered via a convenient web interface. Open your browser and navigate to the address shown in the console, which will be something like:
https://IP-ADDRESS:8006
The browser will warn you that the security certificate is not trusted. This is normal, as it is a self-signed certificate. Accept the security exception to proceed.
Log in with the username root and password you set during installation. Welcome to the Proxmox VE 9 control panel!

Why Choose Proxmox? Key Features
Proxmox VE is much more than just a hypervisor. It is a complete platform that integrates advanced virtualization technologies, whose source code is freely accessible.
- Centralized Management: Control nodes, storage, and networking from a single interface.
- Clustering and High Availability (HA): Group multiple servers into a cluster to ensure the operational continuity of your services.
- Flexible Storage: Supports local (LVM, ZFS) and network (iSCSI, Fibre Channel, NFS, Ceph) storage.
- Integrated Backup: Seamlessly integrates with Proxmox Backup Server (PBS) for efficient, incremental, and deduplicated backups of VMs and containers.
- Integrated Firewall: Protect your infrastructure with granular firewall rules applicable at the datacenter, node, or individual VM/container level.
Transform Your IT Infrastructure with Virtualization
Installation is only the first step. Designing, implementing, and maintaining a high-performance, secure virtualization infrastructure requires expertise and experience.
Trust our specialists. We offer Proxmox Support and Consulting services to help you get the most out of this platform. Discover our solutions for businesses and request a personalized quote.
Frequently Asked Questions (FAQ)
Is Proxmox VE really free?
Yes, Proxmox VE is open-source and free software. Paid subscriptions are optional and offer access to "Enterprise" repositories (more tested) and professional technical support.
What is the difference between a VM and an LXC container?
A VM (Virtual Machine) emulates an entire hardware system and runs a complete operating system, offering maximum isolation. An LXC container shares the host system's kernel, making it much lighter and faster, ideal for running isolated Linux applications without the overhead of a full VM.
Can I install Proxmox on a Raspberry Pi?
No, Proxmox VE requires a 64-bit (x86-64) architecture and is not compatible with the ARM architecture of the Raspberry Pi.
What is the best backup for Proxmox VE?
Proxmox is seamlessly integrated with Proxmox Backup Server, allowing you to manage incremental and deduplicated backups to optimize space and network, advanced compression (ZSTD), and encryption for data security.
Where can I find help and discuss with other users?
The official Proxmox forum is the main point of reference. For more informal discussions and real-world use cases, the community on Reddit (r/Proxmox) is extremely active and helpful.